Introduction
As developers make the transition from HTML to XHTML, the <object> element becomes increasingly relevant, especially
when one considers that the <img> tag will not be included in XHTML 2.0. Not surprisingly, Mozilla,
Opera and Safari
have all had near-perfect support for objects for some time now, which makes it possible to scrap the
<img> altogether and use <object type="image/*"> exclusively. That is, if you don't care about 95% of the market share.
Like so much of CSS2 and XHTML, Internet Explorer's support of the object is mediocre at best. Given IE's saturation of the browser market and the fact that the next release could still be years away, it is often tempting for developers to dismiss standards as wishful thinking.
But we don't have to wait for IE to catch up, nor do we have to leave IE users behind. We can code to the standard without alienating the largest browser demographic. Resourceful minds have shown us how: Dean Edwards' IE7 and Erik Arvidsson's PNG Behavior are two excellent examples of how to make IE truly standard's compliant. In this article, we will do more of the same and teach Internet Explorer how to handle objects correctly.
The problem
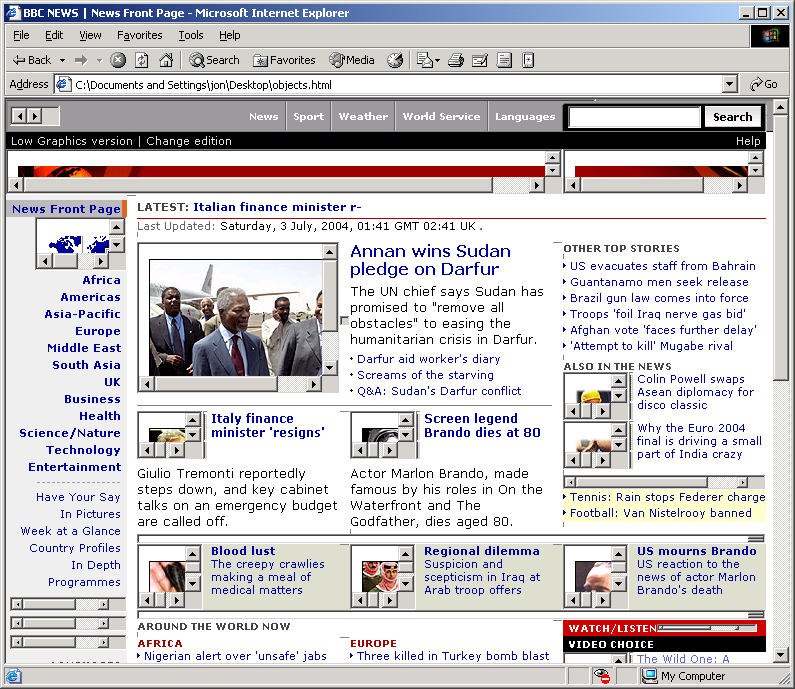
The best way to understand what's wrong with Internet Explorer is to see it in action. See the discussion and an example over at Mark Pilgrim's blog. Or compare these two versions of the BBC news web site—one with images and the other with objects.
What happens is that Internet Explorer essentially renders objects of type image as if they were iframes having their own body and properties. This means that they have borders, margins and scrollbars which cannot be removed via CSS because they are part of a subdocument which is rendered independently of the parent window.
The only way to remove them is to programatically 1. access the body element of each object and restyle it or 2. replace the object with the equivalent img. While it would be fairly trivial to write a script or HTC file that does this, there are several reasons this is insufficient:
- Objects in links are not clickable, which is a major usability issue.
- Margins and scrollbars will be visible on images while the page is loading.
- Images will load even if the user has images turned off.
- For certain screen readers, the user will be unable to read/hear the alternate text.
- Because the images are essentially loaded as separate frames, they take longer to load and use more memory.
- The more images on the page, the greater the CPU cost when scrolling, since each images is a separate subdocument.
The solution
Altering the display properties of the objects or replaceing them with images after they load is inadequate. Internet Explorer needs to unlearn what it has learned about objects, and simply render them as if they were images.
Enter XSL transformations. An XSLT file is an XSL stylesheet that allows us to transform elements in an XML document. In English, that means we can create a special document (XSLT file) that will tell the browser to transform certain elements in our XHTML before loading or rendering them. In this case, the only transformation that will take place is the object-to-img translation, but the possibilities are endless. Luckily for us, Internet Explorer has had excellent XML/XSL support as of version 5.0, which makes our job very easy.
The code
<?xml version="1.0" encoding="utf-8"?>
<xsl:stylesheet version="1.0"
  xmlns:xsl="http://www.w3.org/1999/XSL/Transform">

  <!-- this template matches elements of tye object-->
  <xsl:template match="object">

    <xsl:choose>

      <!--if it's an object image/*, let's replace it with an img-->
      <xsl:when test="(substring(@type,1,6)='image/')">
        <xsl:element name="img">
          <xsl:attribute name="src"><xsl:value-of select="@data"/></xsl:attribute>
          <xsl:attribute name="alt"><xsl:value-of select="./node()"/></xsl:attribute>
          <xsl:if test="@align">
            <xsl:attribute name="align"><xsl:value-of select="@align"/></xsl:attribute>
          </xsl:if>
          <xsl:if test="@class">
            <xsl:attribute name="class"><xsl:value-of select="@class"/></xsl:attribute>
          </xsl:if>
          <xsl:if test="@style">
            <xsl:attribute name="style"><xsl:value-of select="@style"/></xsl:attribute>
          </xsl:if>
          <xsl:if test="@border">
            <xsl:attribute name="border"><xsl:value-of select="@border"/></xsl:attribute>
          </xsl:if>
          <xsl:if test="@width">
            <xsl:attribute name="width"><xsl:value-of select="@width"/></xsl:attribute>
          </xsl:if>
          <xsl:if test="@height">
            <xsl:attribute name="height"><xsl:value-of select="@height"/></xsl:attribute>
          </xsl:if>
          <xsl:if test="@hspace">
            <xsl:attribute name="hspace"><xsl:value-of select="@hspace"/></xsl:attribute>
          </xsl:if>
          <xsl:if test="@vspace">
            <xsl:attribute name="vspace"><xsl:value-of select="@vspace"/></xsl:attribute>
          </xsl:if>
        </xsl:element>
      </xsl:when>

      <!-- any other type of object will be rendered as-is. -->
      <xsl:otherwise>
        <xsl:copy>
          <xsl:apply-templates select="@*|node()"/>
        </xsl:copy>
      </xsl:otherwise>

    </xsl:choose>

  </xsl:template>

  <!-- any other element/node will be rendered as-is. -->
  <xsl:template match="@*|node()">
    <xsl:copy>
      <xsl:apply-templates select="@*|node()"/>
    </xsl:copy>
  </xsl:template>
</xsl:stylesheet>
Save this page as "objectifier.xsl". This is the XSL stylesheet that will transform objects into images. The next step is to link to it from our XHTML. There are a variety of ways, however the one we will look at is the easiest and least error-prone. For this article, I am assuming you have an Apache web server with PHP. This should be possible with other servers and scripting languages, but we will not delve into those here.
There are two reasons we need to use PHP and Apache (or something similar). Since not all browsers support XML and XSLT (or even XHTML), our safest bet is to serve our pages as text/html to everyone except IE. This is where PHP comes in, as it lets us determine the user agent and serve custom content. But it's a hassle putting PHP code in all our .x(ht)ml documents and giving them .php extensions. Enter Apache and content handlers.
If you have access to your Apache httpd.conf file, simply add this code. If not, create an .htaccess file with the following code and place it in the document root.
AddHandler objectifier .xml .xhtml
Action objectifier /objectifier.php
This simply tells the web server to pass any .xml or .xhtml files through our PHP script (objectifier.php) before outputting anything to the client. Now let's create the script:
<?php
  $browser = $_SERVER['HTTP_USER_AGENT'];

  //to verify that the browser is IE Win 5-6 and not another browser pretending
  //to be, we use some regular expressions
  if(preg_match('/MSIE ([56]\.[0-9]+).*Win/',$browser) && !preg_match('/amiga|gecko|opera|omniweb|linux|unix/i',$browser)){
    //set the text/xml content type and output a link to the xslt file
    header('Content-Type: text/xml');
    echo "<?xml version=\"1.0\" encoding=\"utf-8\"?>\r\n";
    echo "<?xml-stylesheet type=\"text/xsl\" href=\"/objectifier.xsl\"?>\r\n";
  }
  else{
    //set the text/html content type and output a doctype
    header('Content-Type: text/html');
    echo "<!DOCTYPE html PUBLIC \"-//W3C//DTD XHTML 1.0 Transitional//EN\" \r\n";
    echo "\"http://www.w3.org/TR/xhtml1/DTD/xhtml1-transitional.dtd\">\r\n";
    echo "<?xml version=\"1.0\" encoding=\"utf-8\"?>\r\n";
  }

  //output the file to the browser
  readfile($_SERVER["DOCUMENT_ROOT"].$_SERVER["REQUEST_URI"]);
?>
Save this file as "objectifier.php" and place it in the document root. This script basically checks the user agent string to see if it is Internet Explorer. If it is, it serves up the file as text/xml and links to the XSLT file. If not, it outputs everything as text/html with a normal doctype.
If you don't feel like copying and pasting, you can download a zip archive with all three files.
Objectify!
And that's it! With those three files in place, all you need to do now is write valid XHTML 1.0 documents, and IE will correctly handle any objects of type image. Please note, that because the script handles the xml declaration and doctype, you should not include them in your xhtml documents, as they would be redundant. Simply start with the html tag.
Here's how it looks on an image-heavy page (80+ images). Notice it loads just as quickly as the original and has none of the problems of the scripting/HTC solutions mentioned above.
End Notes
And with that we've achieved proper object support in IE without even changing our source code. Moral of the story: standards compliance is possible even with the unlikeliest of browsers.
Questions? Corrections? Suggestions? Email me. Feel free to use these scripts throughout your site with or without modification or acknowledgement, although a link to me is always appreciated. Email me if you would like permission to reproduce this article.
Additional Notes
-
Because the document is loaded as xml by IE, you cannot write tag soup. If the document is invalid in any way, it will not render. Personally, I view this as a good thing. With (X)HTML, browsers are way too leniant. The fact that IE won't render an invalid XML document will encourage people to author valid pages.